
WooHoo! You Got Your First “Real” Camera. Now What?
You bought your first “real” camera, and you’re ready to capture some world-class images. The only problem? You look at the body and see a dizzying array of buttons, dials, and menus. To make matters worse, when you “Google” what they do, the technical jargon makes absolutely no sense.
First, take a breath. Don’t worry about the terminology just yet. Everything here at Dennis Consorte Photography is designed to help you navigate this journey.
Understanding your camera’s settings isn’t just about technical perfection; it’s about having the creative freedom to capture a moment exactly the way you envision it. Whether you’re a hobbyist or a budding professional, mastering these three elements will elevate your work instantly.
The Foundation: The Exposure Triangle
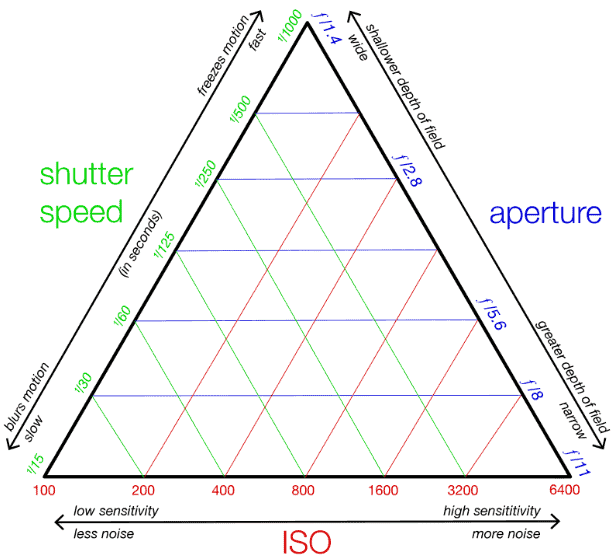
Think of the “Exposure Triangle” as the DNA of every photograph. It consists of Aperture, Shutter Speed, and ISO. These three settings work in a constant dance to balance the light entering your camera.
Don’t focus on being perfect right out of the gate—mastering this trio is a journey, not a race.
1. Aperture: The Eye of Your Lens
I always recommend starting with Aperture because it has the biggest impact on the “mood” of your photo. Aperture is like the pupil of an eye: it opens wide to let light in and narrows to keep it out.
- How we measure it: We use “f-stops” (like f/2.8 or f/11).
- Controlling the Light: A lower f-stop (like f/2.8) means a wide opening (lots of light). A higher f-stop (like f/22) means a tiny opening (less light).
- Depth of Field: This is where the magic happens.
- Want a blurry background (bokeh) for a portrait? Use a low f-stop.
- Want everything sharp from the flower in front of you to the mountain in the distance? Use a high f-stop.
Try This: Turn your dial to Aperture Priority Mode (A or Av). You choose the f-stop, and the camera handles the rest. It’s the best way to see how these changes affect your story in real-time.
2. Shutter Speed: The Blink of a Shutter
If Aperture is the “eye,” Shutter Speed is the “blink.” It determines how long your camera’s sensor is exposed to light, which dictates how motion is captured.
- Freeze the Action: Want to stop a hummingbird’s wings mid-air or a soccer player mid-kick? Use a fast shutter speed (like 1/1000th of a second).
- Show the Motion: Want that silky, “cotton candy” look on a waterfall or the blur of a passing car? Use a slow shutter speed.
- The “Sweet Spot”: For most everyday shots, you want a speed fast enough to prevent “camera shake” (usually at least 1/125th or higher).
Try This: Switch to Shutter Priority Mode (S or Tv). Try taking a photo of a moving pet or a ceiling fan at different speeds to see the difference between a “freeze” and a “blur.”
3. ISO: Light Sensitivity
The final piece of the triangle is ISO. This measures how sensitive your camera sensor is to the light it receives.
- The Base: Most cameras start at ISO 100. This is your cleanest setting and is perfect for bright, sunny days.
- The Boost: When you’re in a dim room or shooting at sunset, you “bump up” the ISO (to 800, 1600, or higher) to help the camera see in the dark.
- The Trade-off: High ISOs can introduce “noise” or grain (it looks like tiny dots on your photo).
The Goal: Modern cameras are incredible at handling high ISO, but you should always try to keep it as low as possible for the crispest image quality. You can always fix a little noise in software later, but you can’t fix a blurry photo caused by a shutter speed that was too slow because the ISO was too low!
Final Thoughts
When you bring Aperture, Shutter Speed, and ISO together, you have the keys to the kingdom. You can tackle almost any lighting challenge or creative vision.
The secret isn’t in a book, it’s in the practice. Your first 1,000 photos might be your “learning” shots, and that’s okay! Every click is a lesson. So, grab your gear, head out the door, and most importantly: Have some fun!
Dive Deeper
📸 Photography 101: Master the basics
⚙️ Gear & Maintenance: Protect your investment
🔭 Beyond the Lens: Find your creative voice
Did you enjoy this post? If you want to keep up with my latest work, get notified when new prints go on sale, or receive more tips like these, consider subscribing to my weekly update. I send out one email every Friday to share what I’m working on and what I’ve learned behind the lens. No spam, just photography.