Photo Courtesy of Wikipedia
Mastering Composition: A Deep Dive into the Rule of Thirds
In the world of photography, there is a distinct line between “taking a picture” and “composing a photograph.” While modern cameras are incredible at handling focus and exposure for us, they cannot decide where to place the subject within the frame. That is the job of the artist.
Among the various “laws” of visual arts, the Rule of Thirds stands as the most fundamental building block. It is the first technique taught in every art school and the first setting adjusted on every professional camera. But why is it so powerful? In this article, I will break down the science, the psychology, and the practical application of the Rule of Thirds to help you create images that don’t just show a subject, but tell a story.
What Exactly is the Rule of Thirds?
The Rule of Thirds is a compositional guideline that suggests an image should be imagined as divided into nine equal parts by two equally spaced horizontal lines and two equally spaced vertical lines.
This creates a 3×3 grid over your viewfinder or LCD screen. The rule suggests that the most important elements of your composition, your subject, the horizon, or a focal point, should be placed along these lines or at the four points where the lines intersect. These intersections are often referred to as “Power Points” or “Crash Points.”
The goal is to move away from the “bullseye” habit. Beginners often place their subject dead-center, which can result in a static, clinical-looking image. By offsetting the subject, you create a sense of “visual tension” and energy that feels more natural to the human eye.
The Psychology: Why Does Our Brain Prefer the Grid?
You might wonder why a simple grid makes a photo look “better.” It comes down to how the human brain processes visual information.
When we look at a centered subject, our eyes tend to lock onto the middle and stay there. The rest of the frame becomes “dead space.” However, when a subject is placed on a third-line, the eye is forced to scan the rest of the image to find the subject. This journey, moving the gaze across the frame, makes the viewing experience more engaging.
Furthermore, in Western cultures, we are trained to read from left to right. Studies in eye-tracking show that viewers naturally gravitate toward the top-left intersection first. By understanding these “Power Points,” you can literally guide your viewer through the story you are trying to tell.
Landscape Photography: Mastering the Horizon
Landscapes are perhaps the easiest place to see the Rule of Thirds in action. The most common mistake in landscape photography is placing the horizon line directly across the center of the frame, effectively cutting the photo in half.
The 1/3 vs. 2/3 Decision
When composing a landscape, you must decide what the “hero” of your shot is.
- The Sky is the Hero: If you have a dramatic sunset or towering storm clouds, place your horizon on the bottom horizontal third-line. This gives two-thirds of the frame to the sky, emphasizing its vastness.
- The Land is the Hero: If you have a foreground filled with wildflowers, a winding river, or interesting rock formations, place the horizon on the top horizontal third-line. This directs the viewer’s attention to the intricate details on the ground.
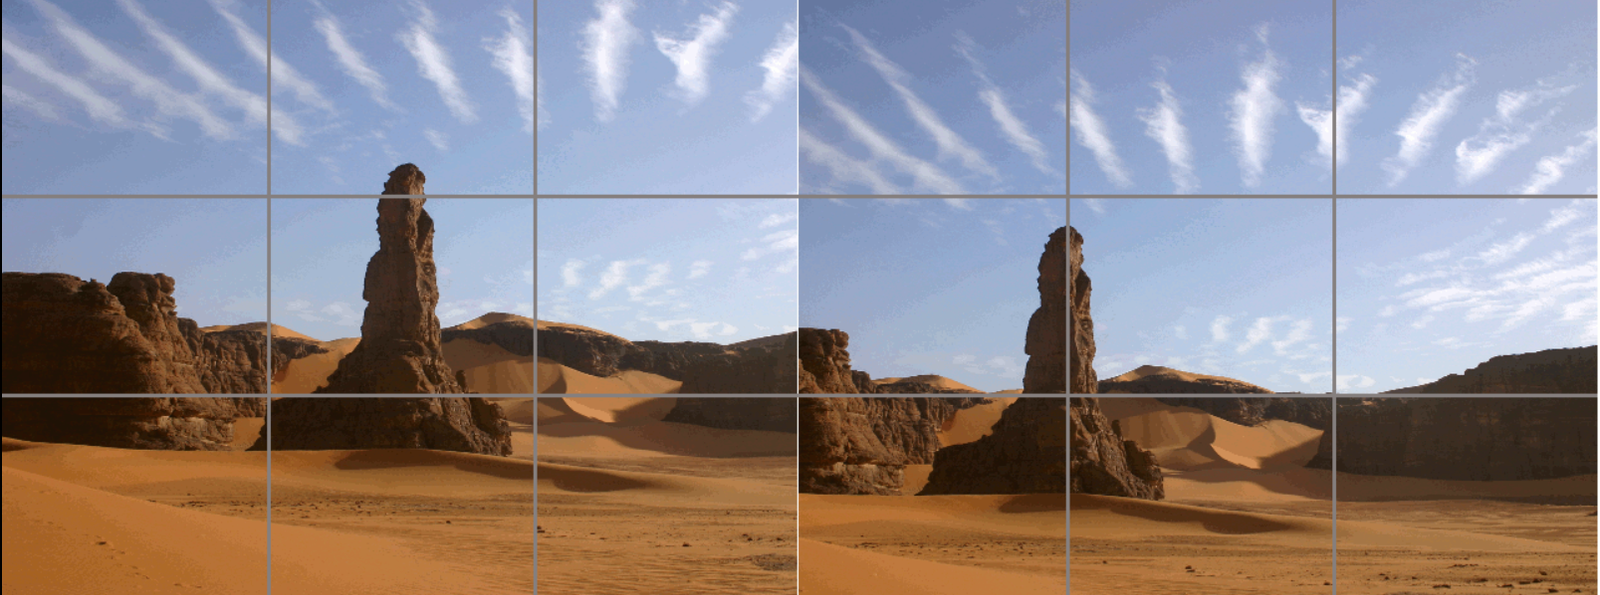
Vertical Landmarks
If your landscape includes a vertical element—like a lone tree, a lighthouse, or a mountain peak—align that element with one of the two vertical third-lines. If the lighthouse is on the left third-line and the horizon is on the bottom third-line, you have created a “balanced imbalance” that feels professional and intentional.
Portraiture: Connecting Through the Eyes
In portrait photography, the most important rule is that the eyes must be the focal point. Because we naturally connect with eyes first, their placement dictates the mood of the entire portrait.
The Top-Third Rule
Generally, you should aim to place the subject’s eyes along the upper horizontal third-line. If the eyes are too low in the frame, the subject can look like they are “sinking.” If they are too high, it creates an awkward amount of chin and neck space.
Lead Room (Looking Room)
This is a crucial concept for your photography website readers. If your subject is looking toward the left side of the frame, you should place them on the right vertical third-line. This gives them “lead room” to look into the empty space.
If you place them on the left third-line while they are looking left, they appear to be staring directly into the edge of the frame, which can make the viewer feel claustrophobic or anxious. Giving them space to “breathe” into the frame creates a more harmonious composition.
3. Action and Wildlife: Capturing Motion
When photographing a moving subject, a bird in flight, a running dog, or a cyclist, the Rule of Thirds helps convey the direction of the story.
Active vs. Dead Space
Much like “Lead Room” in portraits, moving subjects need “Active Space” in front of them. By placing the moving subject on the third-line behind the direction of their movement, you show the viewer where the subject is going. This creates anticipation. If the subject is placed on the “leading” third-line, it looks like they are about to exit the photo, which cuts the action short and feels unsatisfying.
4. Still Life and Macro: Creating Depth
In still life or product photography, the Rule of Thirds is used to create a sense of depth and environment.
Imagine you are photographing a cup of coffee. Instead of centering the cup, place it on the bottom-right intersection. This allows you to use the rest of the frame (the “negative space”) to show the environment, perhaps a blurred-out book or a cozy wooden table. This tells the viewer not just what the subject is, but where it is and what the “vibe” of the scene is.
How to Practice: From Grid to Instinct
Learning the Rule of Thirds is a three-step process:
- Use the Digital Grid: Most digital cameras (Canon, Nikon, Sony, etc.) and all smartphones have a “Grid” setting in the menu. Turn it on and leave it on. It won’t appear in your final photos, but it will train your brain to see the intersections every time you lift the camera to your eye.
- The Crop Tool Technique: Take a look at your old photos, the ones that feel “off.” Open them in an editor like Lightroom or Google Photos. Most cropping tools automatically display a Rule of Thirds grid. Try re-cropping your old photos to align with the intersections. You’ll be amazed at how a simple crop can transform a “snapshot” into a “photograph.”
- The “Four-Shot” Exercise: Next time you find a subject you like, take four different versions of it. Place the subject in the top-left, top-right, bottom-left, and bottom-right intersections. When you get home and look at them on a large screen, notice how the “mood” of the photo changes depending on which intersection you chose.
Common Mistakes to Avoid
- The “Almost” Rule: The most common mistake is placing a subject near the third-line but not quite on it. This looks like an accident. If you’re going to use the rule, be deliberate.
- Forgetting the Background: Don’t get so focused on the grid that you miss a telephone pole growing out of your subject’s head. The grid is the skeleton of the photo, but the light and background are the skin and soul.
- Rigidity: Remember, this is a “Rule of Thirds,” not a “Law of Thirds.” Once you understand how it works, you will intuitively know when it’s okay to nudge the subject a little closer to the center or further to the edge.
Final Thoughts
The Rule of Thirds is the “Golden Key” of photography. It is the simplest way to instantly improve the quality of your images without spending a dime on new gear. By moving your subject away from the center, you invite the viewer to participate in the image, to scan the frame, and to experience the scene as you did.
Keep practicing this grid. Soon, you won’t need the digital lines on your screen anymore; you’ll start to see the world in thirds naturally. And once that happens, you’ll be ready for the next step: knowing exactly when to break the rule for creative effect.
Happy shooting!
Dive Deeper
📸 Photography 101: Master the basics.
⚙️ Gear & Maintenance: Protect your investment.
🔭 Beyond the Lens: Find your creative voice.
Did you enjoy this post? If you want to keep up with my latest work, get notified when new prints go on sale, or receive more tips like these, consider subscribing to my weekly update. I send out one email every Friday to share what I’m working on and what I’ve learned behind the lens. No spam, just photography.